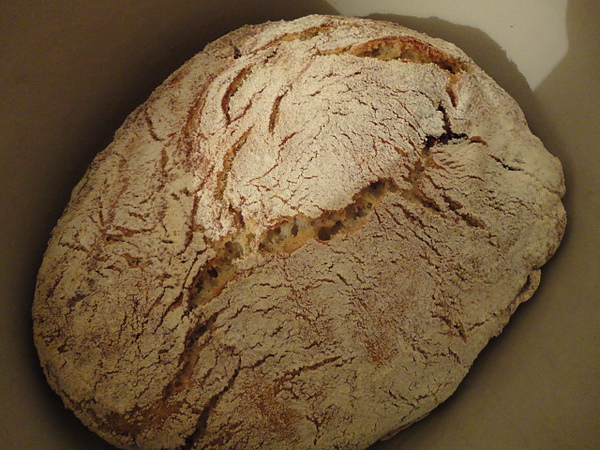
我和老公都非常喜愛此麵包。老實說, 過去這3個月, 我們只在離家不遠的麵包店買過2次棍子麵包(baugettes), 因為我們倆一至認為我自製的有機免揉麵包, 在長時間、慢數發酵加深了麵包味道。而這段期間內, 我也嘗試了添加不同材料製做出不同口味的有機無花果、有機白芝麻、有機核桃及有機綜合穀粒免揉麵包; 也很高興找到了有機的酵母。
在此分享我個人的實驗心得:
(* 再一次強調: 此免揉麵包的 idea 源至Jim Lahey, Sullivan Street Bakery, 我只是依我們的口味喜好在材料和比例上經過多次練習後, 做出了以下的結論:)
準備時間: 麵團慢數發酵約18小時, 外加另外2小時的二次發酵
烘烤時間: 約45分鐘至1小時 (視烤箱而異)

200克 有機中筋麵粉 (我使用法國的 T55), 外加少許用來灑在麵團上
210克 有機全麥高筋麵粉 (我使用法國的 T65, 法國多數麵包店都是使用T65來製做傳統麵包)
¼ 茶匙 有機酵母粉 (或½茶匙新鮮酵母)
1½ 茶匙 細海鹽 (我使用 Guérande 鹽之花, 此鹽之花也有出有機的)
385ml 清水
少許Semonlina(粗粒小麥粉), 用來灑在麵團上
1. 先將2種麵粉、酵母和海鹽於一大碗中混合均勻
2. 緩緩加入水並攪拌均勻 (基本上, 此水量是在經過我2-3次實驗後的結果; 你們可能需要視情況調整, 例如所使用的麵粉吸水量不同、製做此麵包時是否正逢下雨天等等)
*混合後的麵團糊含水量極高 - 這是正常的, 請別擔心
3. 將碗用一保鮮膜覆蓋(需切實將碗覆蓋但請別封的太緊), 然後再用一乾淨的廚用毛巾 (tea towel / kitchen towel) 覆蓋住。將此麵團糊放於一'溫暖處'慢慢發酵18小時 ('溫暖處' 對麵團糊發酵很重要, 現在的法國蠻冷的, 我會將此碗放於暖氣旁, 我家的中央暖氣設定為22-24C)
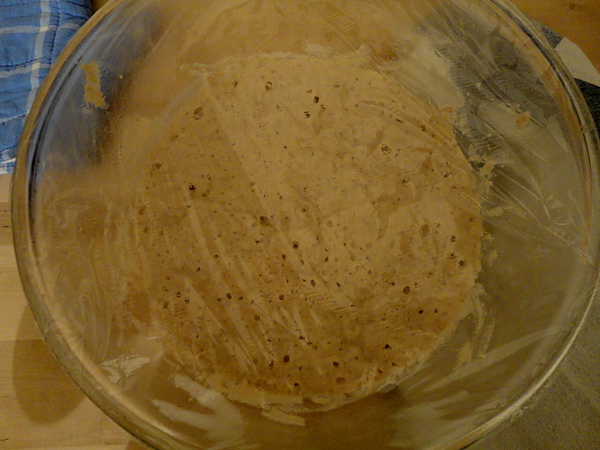
* 如何知道你的酵母是否 '健康' 的運做: 如圖所示, 麵團表面、內應充滿泡泡; 建議你可以在麵團糊混合後的5-6小時後查看是否已見許多泡泡, 若不見此情況, 請將材料重新混過一次
* 18小時後, 麵團表面、內充滿泡泡時即表示麵團已完成第一階段發酵

4. 在工作台上 (我使用矽膠墊) 灑上一層麵粉, 然後將發酵好的麵團(含水量極高)倒出
5. 在麵團上灑上一層麵粉, 如同Youtube 影片上看到的, 將麵團折數次
* 若是有刮麵片或一矽膠攪拌匙spatula, 可以避免兩手都溼黏, 整體的操作也會較順手
** 若想加入綜合穀粒、堅果、乾燥水果等等, 請於此階段加入; 加入你喜歡的添加物後, 將麵團再折個數次以便混和均勻
6. 在一乾淨的廚用毛巾 (tea towel / kitchen towel)上均勻灑上一層麵粉和少許Semonlina(粗粒小麥粉), 然後輕輕的將麵團移至此廚用毛巾 (tea towel / kitchen towel)的半面上

7. 在麵團上灑上一層麵粉和少許Semonlina(粗粒小麥粉), 然後用一保鮮膜非常寬鬆的覆蓋(*因為麵團需要呼吸, 但卻又不可失去水分), 然後將廚用毛巾對折寬鬆的包覆麵團 - 此階段是麵團的第2次發酵, 將它儘可能的放於一溫暖處約2小時或直至麵團漲約2倍大
8. 在步驟7完成前的30-40分鐘將你的琺瑯鑄鐵鍋放入烤箱預熱至240C
(* 琺瑯鑄鐵鍋一但加熱後請小心操作)
9. 當麵團漲至2倍大時, 去除保鮮膜, 小心的將琺瑯鑄鐵鍋取出, 移開鍋蓋, 輕輕的將麵團滑入鍋中(折疊面朝上), 蓋上鍋蓋
10. 覆蓋烤30分鐘, 然後移除鍋蓋後烤約20-25分鐘 (為麵包上色)。將琺瑯鑄鐵鍋取出, 用一矽膠鍋鏟將麵包取出並放於一架上放涼即可

No Knead Bread - final (with recipe)
I love this bread so much and have been playing with the basic dough for a few months. My last twist was with some freshly cracked walnuts and mixed grains. Although it is easy to get very decent bread here in France, still I enjoy making this bread. As I know everything used in making this bread is organic.
PLEASE NOTE AGAIN: The original idea of this bread came from Jim Lahey, Sullivan Street Bakery.
I have modified a few bits to suit our liking.
Preparation time: 18 hours for the bread dough to prove, and plus a further 2 hours for a second proving.
Cooking time: around 45 minutes to 1 hour
200g organic all-purpose flour (I used T55 in France), more for dusting
210g organic strong bread flour (I used whole wheat T65; T65 is used widely by bakeries here to make traditional bread.)
¼ teaspoon organic instant yeast (or ½ teaspoon of fresh yeast)
1½ teaspoons fleur de sel (fine sea salt)
385ml water
Semolina as needed
1. Combine flours, yeast and salt and mix well in a large bowl.
2. Gradually add 385ml water and mix well - you will need to 'slightly' adjust this, based on the type of flour you are using and also the day you are making this bread (e.g. humidity in the air).
* Dough will be very sticky and liquidity but that is normal for this particular recipe.
3. Cover the bowl with plastic wrap (loosely) and then a clean tea towel. Let the dough rest at least 18 hours, at warm room temperature - this is very important. As it is still cold in France at the moment, so I leave the bowl close to the heater.
To check if your dough is proving healthily: you should see plenty of bubbles on the surface (and inside the dough as well - as shown in picture) You should check your dough after the first 5 or 6 hours.

*if you are not seeing a generous amount of bubbles, it means your yeast might not have been fresh, you will need to start over again.
* After 18 hours of proving, your bread dough is ready when it is covered with dotted bubbles.

4. Lightly flour a work surface (or a silicon mat) and pour the dough on it.
5. Sprinkle it with some more flour and fold it over a few times (as seen in the YouTube video clip).
(A dough scraper will be very useful at the stage, or you may use a spatula to prevent getting both hands sticky.)
** This is the stage you can add your own flavour to the bread.
(for example: mixed grains, nuts, dried fruit and etc)
- You will need to fold the dough a few more times if you are adding some flavours into it.
6. Generously sprinkle some flour and semolina on a clean tea towel, and place the dough on it.
7. Sprinkle the dough with some more flour and semolina and cover very loosely with a plastic wrap (you want the dough to be able to breath as well as stay moist) and then cover loosely with the clean tea towel; let it prove for another 2 hours (or until it is doubled in size) in a warm spot.
8. Preheat the oven to 240C, and place your cast iron pot (with its lid on) in the oven at least 30-40 minutes before the dough is ready.
9. Take out your cast iron pot from the oven when the dough is ready. Discard the plastic wrap, remove the lid and carefully slide the dough into the pot, seam side up.
10. Bake for 30 minutes with the lid on, and another 20 to 25 minutes without the lid (this is to give the bread a nice colour). Remove the bread from the pot and transfer to a rack to cool.
Photos from my previous tries,
Organic mixed grains no knead bread
Organic walnuts no knead bread
Version Française (Thanks to Fanny)
Pain sans travail dans une cocotte en fonte
Temps de préparation : 5 min
Temps de repos : compter 18h + 2h soit 20h
(les 18 heures sont indispensables au travail de la levure et donneront plus de saveur à votre pain)
Temps de cuisson : 45 min à 1h selon le four
Je fais ce pain sans travail une fois par semaine car mon mari et moi-même trouvons que celui-ci est bien plus savoureux qu'une simple baguette en boulangerie et même certains autres pain. Je me suis inspirée d'une technique américaine, Jim Lahey, Sullivan Street Bakery
pour réaliser mes propres pains avec variantes (pain aux figues, pain aux céréales, pain aux noix, pain au sésame...). Aussi, les adeptes du BIO comme moi pourront se faire plaisir et réaliser leurs pains selon leurs exigences.
Ingrédients :
-200 g de farine type 55
-210 g de farine type 65
-1/4 cuillère à café de levure boulangère en sachet ( ou 1/2 cc de levure boulangère fraîche)
-1,5 cuillère à café de fleur de sel
- 385 ml d'eau
Dans un bol profond (type saladier), verser les farines, le sel et la levure puis ajouter l'eau et mélanger jusqu'à obtention d'une pâte liquide (ce-ci ne demande pas beaucoup de temps ni de réel travail). Le couvrir d'un film plastique sans que ce soit totalement hermétique (voir les photos) et réserver le bol dans un endroit chaud pour 18h.

Lorsque vous récupérez le bol, vous pouvez y voir votre pâte remplie de bulles ce qui signifie que la levure a bien travaillé. Sur un torchon, verser abondement et uniformément de la farine t55 avec un peu de semoule fine ou moyenne et réserver.
Verser le contenu du bol sur une feuille en silicone ou sur une plaque ou sur une planche de travail préalablement farinée généreusement (attention votre pâte sera encore très liquide c'est pourquoi il est indispensable de se munir d'un paquet de farine et d'une spatule pour travailler la pâte sans se salir les mains).
La pâte versée, le travail se fait par pliure, c'est à dire qu'il faut fariner (ni trop) votre pâte et la plier en 4 en ramenant les bords vers le milieu(voir vidéo). Répéter l'action jusqu'à obtention d'une pâte un peu plus consistante. Pour les pains spéciaux (sésame, pavot, céréales etc...), rajouter vos ingrédients pendant le "pliage".
Récupérer la pâte à l'aide de votre spatule et la déposer sur votre torchon fariné. Déposer sur le haut de la pâte un film plastique et refermer le torchon en le repliant.
Laisser reposer votre pâte dans un endroit chaud pendant 2h ou jusqu'à ce que la pâte soit bien gonflée (son volume doit presque doubler).
30 ou 40 minutes avant la fin de repos, préchauffer votre four ainsi que votre cocotte et son couvercle à 240°C.
La pâte prête, sortir la cocotte chaude du four et retirer son couvercle. Porter à proximité la cocotte de la pâte pour plus de facilité.
Ouvrir le torchon, retirer le film plastique et sans vous brûler, déposer ou glisser la pâte telle que dans la cocotte (ne vous donnez pas la peine de positionner votre pâte dans la cocotte car celle-ci le fera d'elle-même). Refermer le couvercle et mettre au four pour 30 min environ.
Après 30 min, retirer juste le couvercle pour donner un peu de couleur à votre pain et laisser cuir entre 15 et 25 min selon le four.
Sortir la cocotte et récupérer le pain cuit en le renversant. Laissez-le refroidir, de préférence sur une grille. Dégustez tiède ou à température ambiante.


 留言列表
留言列表